How to check Linux HDD S.M.A.R.T. with PRTG sensor

How to check Linux HDD S.M.A.R.T. with PRTG sensor

CentOS HDD S.M.A.R.T. shell script.

 Create path 

/var/prtg/scripts

 Install smartmontools

yum install smartmontools

 Start the service

service smartd start
chkconfig smartd on

 Create shell script

touch hddsmart.sh

 And paste the following

#!/bin/bash
serviceIsRunning=false
var1=$(smartctl -H /dev/sda |grep result |sed 's/..............................$
var2=$(echo $data)
if [ "$var1" == PASSED ]
then
serviceIsRunning=true
echo "0:200:PASSED"
fi
if [ $serviceIsRunning == false ]
then
echo "2:404:FAILED"
fi

 Save and Exit

 Make it executable

chmod +x hddsmart.sh

Go to PRTG : 

Add Sensor- SSH Script
Choose script - hddsmart.sh

Save


! Make sure your PRTG Server has access to Asterisk Server, if not, add root username and password
to the credentials in the BASIC DEVICE SETTINGS

Screenshot from 2016-05-31 18-10-05

How to monitor Linux CPU temperature with PRTG sensor

How to monitor Linux CPU temperature with PRTG sensor

CentOS CPU Temerature shell script.

 Create path 

/var/prtg/scripts

 Install lm_sensors

yum install lm_sensors

 Create shell script

touch temperature.sh

 And paste the following

#!/bin/bash
data=$(sensors | grep 'Core 0:' | awk '{print $3}' | cut -c2-3)
echo "0:"$data":OK!"

 Save and Exit

 Make it executable

chmod +x temperature.sh
modprobe coretemp

Go to PRTG : 

Add Sensor- SSH Script
Choose script - temperature.sh
Unit String- Celsius

Save

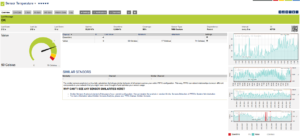
Here’s the result :

Screenshot from 2016-06-07 11-36-46

! Make sure your PRTG Server has access to Asterisk Server, if not, add root username and password
to the credentials in the BASIC DEVICE SETTINGS

Screenshot from 2016-05-31 18-10-05

How to install Arch Linux

How to install Arch Linux

Arch Linux installation.

 Disk layout

cfdisk /dev/sda

 Create file system ext4

mkfs.ext4 /dev/sda1

 Create swap file system

mkswap /dev/sda2

 Enable swap file system

swapon /dev/sda2

Mount the primary partition

mount /dev/sda1 /mnt

 Create home directory

mkdir /mnt/home && mount /dev/sda1 /mnt/home

 Installation

pacstrap /mnt base base-devel
pacstrap /mnt grub-bios
genfstab –p /mnt >> /mnt/etc/fstab
arch-chroot /mnt

Configuration

vi /etc/hostname
vi /etc/hosts
vi /etc/vconsole.conf – #KEYMAP=ru FONT=cyr-sun16 FONT_MAP=
nano /etc/timezone – #Europe/Moscow
ln –s /usr/share/zoneinfo/Europe/Moscow /etc/localtime
hwclock –-systohc –-utc
nano /etc/locale.gen – #ru_RU.UTF-8 UTF-8 en_US.UTF-8 UTF-8
nano /etc/locale.conf – #LANG=”ru_RU.UTF-8”
locale-gen

 Grub installation

mkinitcpio –p linux
grub-install /dev/sda #--force
grub-mkconfig –o /boot/grub/grub.cfg
systemctl enable dhcpcd

Exit

umount /mnt
reboot

Add user

useradd –g users –G wheel,audio,video,storage –m testuser1
usermod -G wheel testuser1
passwd testuser1
cd /etc/
nano sudoers #after root ALL=(ALL) ALL add
testuser1 ALL=(ALL) ALL


 Desktop environment installation

XFCE

pacman –Suy xorg xorg-xinit xorg-utils
pacman –S xfce4 lxdm
systemctl enable lxdm

 KDE

pacman –S kde gamin
pacman –S kde-110n-ru
touch ~/.xinitrc
nano~/.xinitrc #add exec ck-launch-session startkde
systemctl enable kdm service
systemctl start kdm service

 GNOME

pacman –S gnome
systemctl enable gdm.service

Sound

pacman –S alsa-utils alsa-oss

 Prerequisites for installing the video card driver

pacman –S binutils make make gss Linux-headers

Keyboard Layout

setxkbmap –layout “us,ru” –option “grp:alt_shift_toggle”
How to enable SNMP on CentOS

How to enable SNMP on CentOS

To enable SNMP on CentOS

yum install net-snmp-utils -y
yum install net-snmp -y
mv /etc/snmp/snmpd.conf /etc/snmp/snmpd.conf.org
vi /etc/snmp/snmpd.conf
rocommunity public

Save and Exit

/etc/init.d/snmpd start
chkconfig snmpd on

Make sure you configured your Firewall

How to Install Linux, Apache, MySQL, PHP (LAMP) stack on CentOS 6

How to Install Linux, Apache, MySQL, PHP (LAMP) stack on CentOS 6

sudo yum install httpd
sudo /usr/bin/mysql_secure_installation
 
By default, a MySQL installation has an anonymous user, allowing anyone
to log into MySQL without having to have a user account created for
them.  This is intended only for testing, and to make the installation
go a bit smoother.  You should remove them before moving into a
Remove anonymous users? [Y/n] y                                            
 ... Success!
Normally, root should only be allowed to connect from 'localhost'.  This
ensures that someone cannot guess at the root password from the network.

Disallow root login remotely? [Y/n] y
... Success!

By default, MySQL comes with a database named 'test' that anyone can
access.  This is also intended only for testing, and should be removed
before moving into a production environment.

Remove test database and access to it? [Y/n] y
 - Dropping test database...
 ... Success!
 - Removing privileges on test database...
 ... Success!

Reloading the privilege tables will ensure that all changes made so far
will take effect immediately.

Reload privilege tables now? [Y/n] y
 ... Success!

Cleaning up...

All done!  If you've completed all of the above steps, your MySQL
installation should now be secure.

Thanks for using MySQL!
sudo yum install php php-mysql
sudo chkconfig httpd on sudo chkconfig mysqld on
sudo service httpd restart
yum install mysql mysql-server -y
service mysqld start 

How to fix „device eth0 does not seem to be present” after migrating Virtual Server

Check network:

# ifconfig
lo        Link encap:Local Loopback
          inet addr:127.0.0.1  Mask:255.0.0.0
          inet6 addr: ::1/128 Scope:Host
          UP LOOPBACK RUNNING  MTU:16436  Metric:1
          RX packets:0 errors:0 dropped:0 overruns:0 frame:0
          TX packets:0 errors:0 dropped:0 overruns:0 carrier:0
          collisions:0 txqueuelen:0
          RX bytes:0 (0.0 b)  TX bytes:0 (0.0 b)

 Try to start Eth0 device

# ifup eth0
Device eth0 does not seem to be present, delaying initialisation

To Solve this :

Delete networking interface rules file so that it can be regenerated and reboot your CentOS system.

# rm /etc/udev/rules.d/70-persistent-net.rules
# reboot

New Mac address has been generated:

# This file was automatically generated by the /lib/udev/write_net_rules
# program, run by the persistent-net-generator.rules rules file.
#
# You can modify it, as long as you keep each rule on a single
# line, and change only the value of the NAME= key.
# PCI device 0x8086:0x100e (e1000)
SUBSYSTEM=="net", ACTION=="add", DRIVERS=="?*", ATTR{address}=="08:00:27:fe:c1:03", ATTR{type}=="1", KERNEL=="eth*", NAME="eth0"

Now edit /etc/sysconfig/network-scripts/ifcfg-eth0,

Add   new  HWADDR generated or  remove it 
Remove UUID   line

Restart the networking service

# service network restart
Shutting down interface eth0:                              [  OK  ]
Shutting down loopback interface:                          [  OK  ]
Bringing up loopback interface:                            [  OK  ]
Bringing up interface eth0:  Determining if ip address 192.168.1.99 is already in use for device eth0...
                                                           [  OK  ]
# ifconfig
eth0      Link encap:Ethernet  HWaddr 08:00:27:FE:C1:03
          inet addr:192.168.1.99  Bcast:xxxxxxxx  Mask:255.255.255.0
          inet6 addr: fe80::a00:27ff:fefe:c103/64 Scope:Link
          UP BROADCAST RUNNING MULTICAST  MTU:1500  Metric:1
          RX packets:4400 errors:0 dropped:0 overruns:0 frame:0
          TX packets:129 errors:0 dropped:0 overruns:0 carrier:0
          collisions:0 txqueuelen:1000
          RX bytes:387597 (378.5 KiB)  TX bytes:19567 (19.1 KiB)

Enjoy!

How to monitor Asterisk trunks with PRTG

How to monitor Asterisk trunks with PRTG

Create shell script

touch trunk.sh

Add the content to the script

#!/bin/bash
serviceIsRunning=false
var1=$(/usr/sbin/asterisk -rx "sip show peers" |grep trunk_name |awk '{print $6}'| sed 2,2d)
var2=$(echo $data | awk '{print $2}')
if [ "$var1" == OK ]
then
serviceIsRunning=true
echo "0:200:running"
fi
if [ $serviceIsRunning == false ]
then
echo "2:404:UNREACHABLE"
fi

Save the script and make it executable

chmod +x trunk.sh

Try to run it

./trunk.sh

Go to the PRTG, and add the SSH Script sensor to the device

In the „Script” field choose trunk.sh and SAVE

! Make sure your PRTG Server has access to Asterisk Server, if not, add root username and password
to the credentials in the BASIC DEVICE SETTINGS
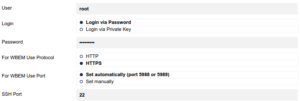
Screenshot from 2016-05-31 18-10-05