Create shell script
touch trunk.sh
Add the content to the script
#!/bin/bash
serviceIsRunning=false
var1=$(/usr/sbin/asterisk -rx "sip show peers" |grep trunk_name |awk '{print $6}'| sed 2,2d)
var2=$(echo $data | awk '{print $2}')
if [ "$var1" == OK ]
then
serviceIsRunning=true
echo "0:200:running"
fi
if [ $serviceIsRunning == false ]
then
echo "2:404:UNREACHABLE"
fi
Save the script and make it executable
chmod +x trunk.sh
Try to run it
./trunk.sh
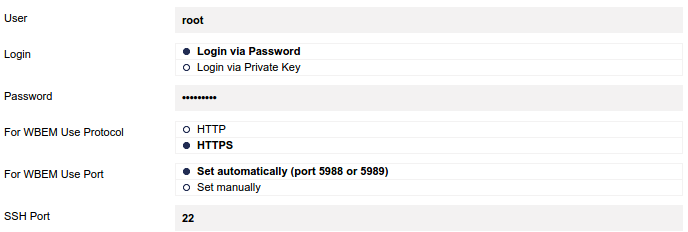
Go to the PRTG, and add the SSH Script sensor to the device
In the «Script» field choose trunk.sh and SAVE
! Make sure your PRTG Server has access to Asterisk Server, if not, add root username and password
to the credentials in the BASIC DEVICE SETTINGS
Check network:
# ifconfig
lo        Link encap:Local Loopback
          inet addr:127.0.0.1  Mask:255.0.0.0
          inet6 addr: ::1/128 Scope:Host
          UP LOOPBACK RUNNING  MTU:16436  Metric:1
          RX packets:0 errors:0 dropped:0 overruns:0 frame:0
          TX packets:0 errors:0 dropped:0 overruns:0 carrier:0
          collisions:0 txqueuelen:0
          RX bytes:0 (0.0 b)  TX bytes:0 (0.0 b)
Try to start Eth0 device
# ifup eth0
Device eth0 does not seem to be present, delaying initialisation
To Solve this :
Delete networking interface rules file so that it can be regenerated and reboot your CentOS system.
# rm /etc/udev/rules.d/70-persistent-net.rules
# reboot
New Mac address has been generated:
# This file was automatically generated by the /lib/udev/write_net_rules
# program, run by the persistent-net-generator.rules rules file.
#
# You can modify it, as long as you keep each rule on a single
# line, and change only the value of the NAME= key.
# PCI device 0x8086:0x100e (e1000)
SUBSYSTEM=="net", ACTION=="add", DRIVERS=="?*", ATTR{address}=="08:00:27:fe:c1:03", ATTR{type}=="1", KERNEL=="eth*", NAME="eth0"
Now edit /etc/sysconfig/network-scripts/ifcfg-eth0,
Add   new  HWADDR generated or  remove it
Remove UUID   line
Restart the networking service
# service network restart
Shutting down interface eth0:                              [  OK  ]
Shutting down loopback interface:                          [  OK  ]
Bringing up loopback interface:                            [  OK  ]
Bringing up interface eth0:  Determining if ip address 192.168.1.99 is already in use for device eth0...
                                                           [  OK  ]
# ifconfig
eth0      Link encap:Ethernet  HWaddr 08:00:27:FE:C1:03
          inet addr:192.168.1.99  Bcast:xxxxxxxx  Mask:255.255.255.0
          inet6 addr: fe80::a00:27ff:fefe:c103/64 Scope:Link
          UP BROADCAST RUNNING MULTICAST  MTU:1500  Metric:1
          RX packets:4400 errors:0 dropped:0 overruns:0 frame:0
          TX packets:129 errors:0 dropped:0 overruns:0 carrier:0
          collisions:0 txqueuelen:1000
          RX bytes:387597 (378.5 KiB)  TX bytes:19567 (19.1 KiB)
Enjoy!
sudo yum install httpd
sudo /usr/bin/mysql_secure_installation
By default, a MySQL installation has an anonymous user, allowing anyone
to log into MySQL without having to have a user account created for
them.  This is intended only for testing, and to make the installation
go a bit smoother.  You should remove them before moving into a
Remove anonymous users? [Y/n] y
 ... Success!
Normally, root should only be allowed to connect from 'localhost'.  This
ensures that someone cannot guess at the root password from the network.

Disallow root login remotely? [Y/n] y
... Success!

By default, MySQL comes with a database named 'test' that anyone can
access.  This is also intended only for testing, and should be removed
before moving into a production environment.

Remove test database and access to it? [Y/n] y
 - Dropping test database...
 ... Success!
 - Removing privileges on test database...
 ... Success!

Reloading the privilege tables will ensure that all changes made so far
will take effect immediately.

Reload privilege tables now? [Y/n] y
 ... Success!

Cleaning up...

All done!  If you've completed all of the above steps, your MySQL
installation should now be secure.

Thanks for using MySQL!
sudo yum install php php-mysql
sudo chkconfig httpd on sudo chkconfig mysqld on
sudo service httpd restart
yum install mysql mysql-server -y
service mysqld start
To enable SNMP on CentOS
yum install net-snmp-utils -y
yum install net-snmp -y
mv /etc/snmp/snmpd.conf /etc/snmp/snmpd.conf.org
vi /etc/snmp/snmpd.conf
rocommunity public
Save and Exit
/etc/init.d/snmpd start
chkconfig snmpd on
Make sure you configured your Firewall